Taking screenshots is tedious and time-consuming. It’s just not possible to take a screenshot on your PC.
Taking screenshots on a computer is a frustrating and time-consuming process. Users will have to use the PrtScn button, then open Paint or Word to capture the image, and finally save it into some external location before going back to work. It’s just too much work for such a tedious task!
Snipping Tool is the best solution for saving screenshots on your PC. With Snipping Tool, you can easily take screenshots, save them as an image file, make changes or notes to it, and then share with others. You can also take screenshots of the software.
Table of Contents
What is Snipping Tool
The Snipping Tool is a free program that allows you to capture the screen, or a specific area of the screen, and save it as a file. It can be used for anything from capturing an error message to taking a screenshot of an entire webpage.
The Snipping Tool is available in all versions of Windows 10 and has been integrated into the Windows Ink Workspace. You can use this as an alternative screen capture software.
5 Amazing Use Cases for the Snipping Tool
The snipping tool is a free screenshot utility that is part of the Windows 10 operating system.
Here are 5 amazing use cases for the snipping tool:
- In short, screenshots can be turned into full-blown presentations with a few simple steps.
- Screenshots can also be used for saving tutorials or instructions for quick access.
- Screengrabs are a great way to share information or an image without having to email it or upload it to a website.
- Snips can be taken without interrupting what you were doing on your computer, which provides an easy way to quickly grab save important information during an online financial transaction, while meeting with a customer or when taking notes during the workday.
- You could also use the snip and share the feature
How to Use Snipping Tool
Snipping Tool is a screen capture tool that enables users to create, edit, and share screenshots.
This application is designed for capturing and editing the screen in different ways. It also lets users share their snipped images on social networks or an email. The tool consists of four elements: the Snipping Tool icon, a button that opens the Snipping Tool window, a window with two modes, and a toolbar with several buttons. This application can be used in various ways and has various use cases.
With the help of this handy little app, you’ll never have to worry about taking screenshots again!
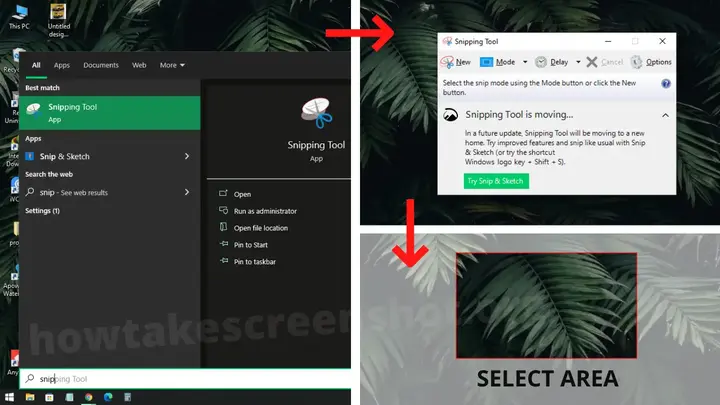
- Click on “Search”
- Enter “Snip”
- Click on the Snipping Tool icon.
- Click “New”
- Choose the area to capture
- Save the screenshot to your computer
Snipping Tool will be moving to a new home. Try improved features and snip like usual with Snip & Sketch. (Windows Key + Shift + S)
Snipping Tool shortcuts
- Alt+M – Choose a snipping mode.
- Alt+N – Create a new snip in the same mode as the last one.
- Shift+Arrow keys – Move the cursor to select a rectangular snip area.
- Alt+D – Delay capture by 1-5 seconds.
- Ctrl+C – Copy the snip to the clipboard.
How to Use the Snipping Tool for Screenshot Sharing on Social Media
The snipping tool is a built-in screenshot feature that is available on Windows 10. It lets you take a screenshot of the selected area on your screen and then share it with the social media platform of your choice.
You can use this tool to capture a small section of your screen and share it with your followers on social media. You can also use it to highlight something important in an image or video that you are sharing.
How Does The Snip Editor Compare To Other Desktop Screen Capture Software Tools?
The Snip Editor is a desktop screen capture software tool that is used to capture and edit screenshots. It can be used by anyone who needs to take screenshots on their computers, such as content writers, bloggers, and programmers.
One of the benefits of The Snip Editor over other desktop screen capture software tools is that it has a built-in editor where you can draw on your screenshot before saving it. This will allow you to make your screenshot more informative and engaging when you share it with others.
The Snip Editor also has a variety of editing tools like cropping, rotating, highlighting text, adding shapes, etc., which means that you can use the editor for more than just taking screenshots.
Read also:- Another way to take a screenshot
FAQ:-
What is the purpose of the snipping tool?
Take a snapshot to copy words or images from all or parts of your PC screen.
What are the main features of the snipping tool?
1. Free-form snip – Draw a free-form shape around an object.
2. Rectangular snip – Drag the cursor around an object to form a rectangle.
3. Window snip – Select a window, such as a browser window or dialog box, that you want to capture.
4. Full-screen snip – Capture the entire screen.
Does Snipping Tool lose quality?
It doesn’t capture the same quality as your screen, it lowers the quality a lot. But it is easy to use.
I was very happy to discover this great site. I need to thank you for your time for this particularly wonderful read!! I definitely liked every part of it and I have you bookmarked to check out new information on your blog.