Many MacBook users don’t know how to take a screenshot on their Mac computer.
When you’re trying to show off your new website on Facebook or share an error with your developer, you’ll find it frustrating when the only way you know how to get a screenshot is by taking a picture of your computer screen, which can be blurry and underexposed.
It’s not that hard to take a screenshot on MacBook! Here, we have seven ways for you to take screenshots, each with its benefits and drawbacks. Just pick the best method that suits you
Table of Contents
What is Screenshot?
A screenshot is a digital image that captures the contents of the computer screen. A screenshot is created by the operating system or software running on the device running the screen.
7 Tips to Take Screenshots on Mac
Take a screenshot on MacBook with key
Step 1

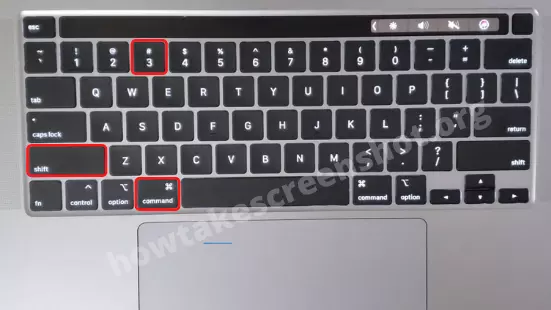
press and hold these three keys together: Shift + Command (⌘) + 3.
Step 2
A preview of your screenshot appears in the corner of your screen, click to edit the Capture screen. Or you can wait for the screenshot to be saved to your desktop.
Capture Part of the Screen
Follow My Step if you want to capture only part of your screen.
Total Time: 3 minutes
Step 1

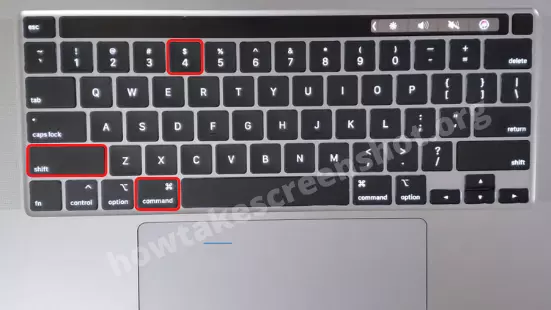
Hold these three keys together: Shift + Command (⌘) + 4.
Step 2
Drag the plus sign to select the area to capture the screen. To move the selection, hold down the Space bar as you drag. Press Esc (Escape) to cancel screenshot taking.
Step 3
release the mouse or trackpad button.
Step 4
A preview of your screenshot appears in the corner of your screen, click to edit the Capture screen. Or you can wait for the screenshot to be saved to your desktop.
Capture a window or menu

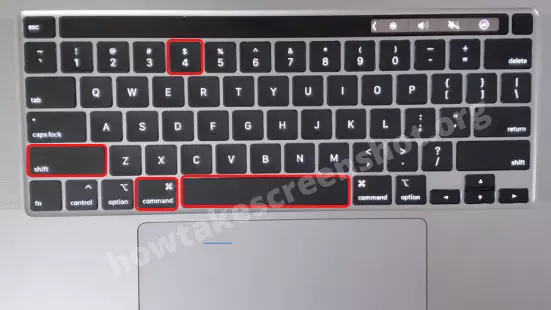
- Press and hold the following keys together: Shift + Command (⌘) + 4 + Spacebar. The pointer changes to a camera icon. (press Esc (Escape) if you want to cancel the screenshot)
- Click the window or menu to capture. To remove the shadow of the window from the screenshot, hold down the Option key while clicking.
- A preview of your screenshot appears in the corner of your screen, click to edit the Capture screen. Or you can wait for the screenshot to be saved to your desktop.
Use the screenshot toolbar
Just press and hold Command (⌘) + shift + 6 and your Mac will capture the entire Touch Bar. The file will be saved to the desktop.
Screenshot on MacBook in Touch Bar
In addition to keyboard shortcuts, you can also use the screenshot toolbar. The Screenshot toolbar is useful for things like recording your screen and changing your Screen capture settings.

Press Shift + Command (⌘) + 5 by default to open it, the tools will appear at the bottom of the screen, but you can move them around if you want, on the left you will find the controls for taking screenshots. You can choose to capture the entire screen in a single window or part of the screen. You will also find tools to record your entire screen or a portion of the screen for viewing. click customization options here you will find useful settings and features like setting a screenshot timer or changing your save location, now you are ready to take your screenshots with these handy shortcuts.
Take a screenshot using Preview

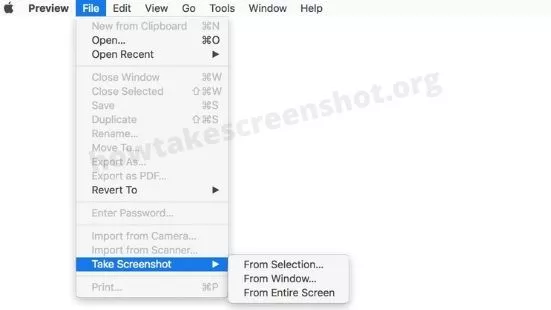
- Click on the File option on Preview.
- then click on Take Screenshot.
- Choose the option you want to capture the screen.
How can I take a screenshot using the command line in Terminal?
try help:
man screencaptureuse delays:
screencapture -T 10 ~/Desktop/screenshot.pngAlso, Read: Take a Screenshot on Windows
Screenshot With Software
Lightshot
Lightshot is a lightweight, easy-to-use screen saver. Once the tool is called, the user selects its screen
- Using the drag tool, immediately drag Complete user-friendly floating Blood to hang pictures there.
- After taking a screenshot with this software, you can immediately edit it.
- It can then be saved to a file user hard disk or internet service prntscr.com is called and distributed in public.
Paste clipboard screenshot on MacBook
Press and hold control together with any of the combinations above. Mac takes a screenshot and copies it to the clipboard.
How can I paste it into a document or something?
command + V Mac pastes the screenshot (that is in the clipboard) into a document or image you are currently editing.
Final Word
This is the complete in-depth guide about how to capture a screen on a MacBook. In this guide, I have shared 7 different methods to capture screens on a MacBook.
I like the number 3 method the most and I use it most of the time to take screenshots.
If You Like The Guide And It Helps You To Take a Screenshot on MacBook. Then share with a friend.
